Softscape

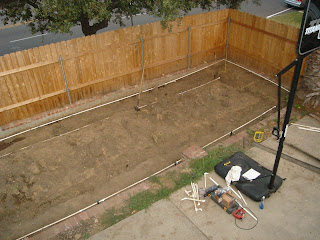
Planted the hedges along the interior side of the fence. These were obtained from the Garden View wholesale nursery in Irwindale. Prices are average or better but the selection and quality is much larger.

Once the bushes were in the soil could be raked out and leveled by dragging a 2x4 on a rope and then using a rented roller to perfect the surface. The area was seeded with Barenbrug Water Saver Rhizomatous Tall Fescue (RTF) as it has runners that make it self healing and it is more heat tolerant than Scotts.

New Fence

Replaced the wood fence, old redwood and new pine/cedar. About 200 new boards of redwood plus a few posts, concrete and Simpson strong ties to connect the stringers. The existing frame will be used with a replacement of two posts and the addition of a third stringer along the new sections.

The existing section of new fence was put on steel poles sunk into the ends of the block wall. To cut off the steel poles the brick work around the base of the pole had to be chiseled out and the pole cut off with the reciprocating saw. A new brick covered the pole stump.

The new posts ware 4x4 redwood posts set flush with the back of the wall. This allows for the brick topping to show on the exterior while using the wall for one side of the support. The trick is the pour some concrete in the bottom of the hole and let it set before putting the post in. This keeps the dirt from touching the post and letting termites bore into the post.

Another trick was to layout the boards on the patio to let the wood dry. The boards were turned every day to dry them evenly. This keeps bending to a minimum once mounted on the stringers. Even so, the boards shrunk a bit putting ¼ inch gaps between the boards after being mounted flush. An acceptable gap.

Wood stain and waterproofing has been delayed to allow the wood to get a patina first.

Dirt Cheap!

Found the cheap dirt! 8 yards of really rich top soil and 5 yards of leaf post for about $250 delivered.

Soil and leaf post is delivered by Cal Blend. The smell of the leaf post is heavenly! Staged the load in the driveway and remove some fence panels to shovel the dirt over the wall. It’s a great work out and takes three shifts to get it all loaded in, including spreading leaf post under all the plantings. Careful not to mulch too thickly around the base of bushes to avoid rot.

Hedges

Hedges for the interior side of the fence have been planed in the front yard instead. This is because the city inspector said he would measure the fence from the dirt on the back side of the wall. As there was a significant amount of dirt loss during the reconstruction, new dirt will have to be added. 8 yards of topsoil is running about $800 retail. The shopping will continue until I find it dirt cheap.

New sprinkler lines were installed. These were connected onto the existing feeder line but changed the spacing and moved the pipes to where they would not be in the way of planting.


Get lots of parts, you can always return what you don't use.

Air Conditioning

Temperatures soared and the main air conditioner stopped cold, well actually stopped hot. Repairs shops are not available for several days and every window air condition in the state is sold out – except one. I got luck with a small Gold Star unit and created a lifeboat in one bedroom.

Repairs cost a fortune for just replacing the fuse!

Gutter Guards

Added gutter guards, screens to go over the gutters and keep leaves out. The screen comes on a roll and is easily cut with scissors and shaped by hand. The trick without support bars is to curve the screen and get it tucked into the lip of the gutter and under the roof shingles. A bit of a curve upward rather than flat helps too as long as it doesn’t make the leaves puddle up. Caulking under the edge of the gutter is essential as well since water tends to cling to surfaces before dripping off.

Muntons Are Not Sheep

Windows on the stair landing are painted poorly with paint bubbles filling in the indentations of the ogee routing on the muntuns. The sill is also rough. Stripping was done with a heat gun, this turned out to be a bit tricky to peel the paint and varnish without cracking the panes. Shielding the glass with the putty knife helped limit the damage to just two cracked panes. These were replaced with period glass to retain the slight ripple in the lights. Picking out the paint form the details and sanding was particularly laborious. Since the wood was fir and had been previously stained dark, only natural stain was usable to even out the sanding before final varnish.

Fence Repair

Fence post repair at the rear gate get replaced as the termites have gotten the better of it. A new treated 4x4 post turns out to be a bit large for the existing hole in the concrete. Shaping it down a bit helps but the hole need to be cleaned out and enlarged beneath the concrete in order to pour more concrete. This will keep the post from contacting the soil. Blasting it out with a garden hose and pulling the rocks out by hand creates enough space to pour new cement in. The new latch is self-adjusting with a rod portion that moves vertically by about half an inch, definitely worth the extra money.

Gas Conversion

Installed gas conversion for fireplace. The chimney had been repaired after an earthquake and when the brick work was redone at the top the drafting was changed from the original design. It does not draft properly and puts smoke into the house.

A tee was added to the gas mains and routed across the crawlspace to the fireplace. The fireplace was designed to also provide venting for the old furnace, long since replaced but the secondary shaft made a good place to pipe up and into the firebox. A ¾ inch hammer drill with a masonry bit made short work of getting the pipe through the brick. The valve was a bit more elaborate as it was placed on the bottom shelf of the built in book case to prevent having to drill the hardwood floor or the masonry hearth. It stays out of the way and is still easily accessible. The trick on the install was to have plenty of street elbows handy to “tinker-toy” the way through the sub floor and tight spots.

A flue and chimney cap had been added on move in day to prevent drafts.


Retaining Wall Replacement

The retaining wall was replaced under orders from the city. It was tagged as dangerous since it was leaning out and severly cracked.

This took several trips to city hall to get the permit as the height of the wall and fence combination had to meet certain restrictions. The new code did not allow for the same wall until I was able to measure the entire linear size and determine the section being replaced was less than 50%. The city engineer sneered a bit at my Visio diagrams even though they were printed on a large format printer, they prefer working with certified professionals, too bad.

The tear down and load out of the wall took only a few hours as there was not one piece of rebar in the whole thing. The new wall will have better than minimum spec for the footing and rebar.

The new wall went in easily but the small yard is a total loss. The sprinklers will have to be re-laid and new grass planted.

Painting the Trim

Getting ready to paint the house trim. The exterior is off white with medium grey trim. The trim pieces are supposed to look like half-timbers in the old English style but without being dark brown the illusion is broken.

Estimations are 5 gallons of brown one 28 foot extension ladder and one month working weekends.

Actual effort and materials turns out to be two months, a 30 foot extension ladder 6 gallons of paint, one gallon of epoxy, one package of one pass and primer already on hand.

Several windowsills had either deterioration form sun or termite damage. Two-part general-purpose epoxy filled in the worst of the damage with one pass to finish. Vista Paints recommended laying down primer before the one pass to give it some adhesion.

Preparation of course took most of the time doing repairs to the wood, cleaning, sealing and priming. Color coat took a minimum of two coats with high gutters to most difficult. A few days were too hot to paint.

The real prize was the renovation of the arched front entry and recovery of the front door. Covered in layers of paint ranging from boring grey to loud turquise, a wonderful oak was found under. A bit of water damage at the bottom repaired looked better than coated to look like a navy battleship.


Window Overhaul

Tired of the sticky windows in general and specifically the one in the play room upstairs. If this double hung window could have the upper frame lowered it would let the heat out in summer and would save a bundle on cooling the house. This room is furthest from the heater/air-conditioning.

Removed the molding strips on the inside to release the widows from the frame. It takes a fair amount of cutting paint, and prying to get them out.

Also pull the wood strip that sits between the windows, the outer molding strips and the springs.

Investigation online finds the company that makes the springs is still in business (since 1880). Their website has PDF files with the specifications for all the springs along with a guide for how to weigh the windows on a bathroom scale to order the right ones. They also have engineers you can call to assist. I ordered four new springs as the old ones would not fully retract with all the paint and rust on them.

Using paint remover and a lot of elbow grease the frames are taken down to the bare bones with the glass removed from all but two panes that were a bit stubborn. Better to work around them than to break the muntons.

The lower rail to the upper window is bowed and will have to be completely replaced. Since the piece does not have any fancy routing, just square cuts a replacement is made using a combination of table and hand saws.

I used two part putty (made by Bondo but for general purpose instead of cars) to fill out damaged areas like nail holes, termites, dry rot and a spot where the latch was slamming into the munton and them primed them. Now without the bowed lower rail the panes in the lower fenestration will not fit. The hardware store cuts new ones since it will be impossible to nibble off the 1/8th inch overage.

New moldings for the interior were purchased as pre-cut and shaped stock. While the existing center guide and outer moldings were re-used.

The springs turn out to have a thicker face plate and a bit of carving is required to create the insets needed to get them flush enough. Attaching the ends of the straps is tricky as well as you don’t want to put a kink in the straps. If you can, attach the spring to the window before hand and then insert the spring in the frame once the window is in place. It really depends on how much frame is exposed by the window and the placement of the spring.

The outer sill was rotted fairly well. The wood is redwood that is pretty resistant but has a tendency to get powdery with exposure. Some sanding and some wire brush work got the surface to a point where primer would stick. After priming the general purpose two part putty built up the surface to looking new in shape. Primer only for now as the trim paint will happen this summer.

Some paraffin wax on the runners finishes the job except for finish paint inside and out.

Attic Fan

Installed an attic fan. This fan is about 18 inches in diameter, moves 1600 CFM and is thermostatically controlled. There were already large vents on the north and south side so mounting it is just a matter of adding some framing to give support and then hard wiring it in (a plug could be added but is a bit less professional).

As long as the electrical was being extended, it made sense to add a duplex outlet to the south side of the attic at the opposite end of the floored in section from the access panel. This gives a total of six outlets in two locations.

HVAC Tuning

I added insulation the to heating vents under the house where the flex hose joins the adapter section to feed into the rectangular ducts in the walls. Also re-hung some of the ducts to take mild kinks out. Large pieces of cardboard can make crawling the underside easier on the knees and even a bit cleaner.

The biggest change to the HVAC system was to rebuild the damper into the vent cover located in the living room. This involved removing the vent cover from the wall where it was plastered and painted over the edges. A sharp utility knife kept the damage to a minimum and then plaster and paint to match when replacing it.

The original damper was made from sheet metal. At first an old cookie sheet was though to be the answer but finally a thin piece of furniture grade plywood salvaged from something long forgotten was the answer. A couple of small blocks and some wood screws finished it. It whistles a bit but is not intolerable. I think some felt around the edges would soften or eliminate the sound but also might act as dust catchers. than main result was a better balance between downstairs and upstairs for cooling. this particular vent was at the end of the main plenum and was dumping all the air in the living room.

Next was to seal all the leaks in the HVAC unit in the basement. metal heat tape was used instead of duct tape. The duct tape says it resists 200 degrees but it eventually falls off the really hot surfaces anyway, especially if there is air pressure behind it.

Running the unit with the fan only allowed finding the leaks without making it too hot to touch or so cold it has condensation. Feeling the leaks with your hand will do but a moist hand is even more sensitive.

Lawn Care Part 2

Changed the mowing technique. The grass had not been mowed in a few weeks and it was going to fill the bin twice to mow it all. Lowering the wheels (raising the cutter) resulted in the grass getting cut on the leaf at about three to four inches instead of on the stalk. Now the lawn looks a lot richer after mowing and it is holding in more water.

Repairing the Cat Damage

Repaired the ducts that had been separated and put back the insulation torn off by the cat. Also repaired the screen around the vent pipes from the basement where the cat was getting in. Also checked the rest of the screens. These screens are large enough to double as access panels.

Cats, Dogs & Fleas

A feral cat has knocked some of the basement screen away and made a home under the house. After battling with her for 15 minutes to get her out I see she has kittens. The tactic is changed to capture and rehabilitation. The SPCA provides a trap and she is hauled off the next day. The kittens can’t be found by crawling under the house. They show up a day latter and are captured and tamed. It turns out some of the ductwork was split apart and they were crawling up inside the tube. Nice and toasty as I heat the underside of the house.

The kittens live for a month in the garage and get real fat and friendly. the dog loves herding them in the dog run but eventually they go off to new homes leaving only memories and fleas! the basement floor looks like someone spilled a box of pepper and it’s moving!

Getting rid of fleas is a daunting task. Flea bombs with the highest amount of poison in them applied repeatedly. One bomb placed on the crawl space on the dirt where the cat was and one in the middle of the basement every 5 to 7 days. The flea has this 10-day life cycle in four stages. the poison says it kills three out of four stages so after bombing you have to wait for the new ones to hatch out to kill them as well. What the brochure doesn’t tell you is they don’t all hatch out at once so if you wait 2 weeks like they say you will always miss some. Use the saturation technique and make the space so nothing can live (after all it is the basement.) The fleas can also live a long time without food as the larvae eat the adult scat. Yuck.

The fleas on the dog and in the house are actually easier. She gets restricted to the kitchen and office so only the office carpet needs spraying with a topical spray and then lots of vacuuming in the whole house.

The dog gets flea spray, brushing, vacuuming a couple of times and the best of all, a bath in Dawn dish soap. It actually kills the fleas and you can see them getting rinsed off. These were “cat” fleas so they prefer cats to dogs and humans so they actually went away without too much action in the house. The basement was more persistent probably due to the moisture and temperature.

Patchwork

Repaired the doorframe to the kitchen where pulling the refrigerator through made deep scratches in the wood. Filled out the holes with wood putty, primed and painted to match. Painted the threshold as well since the paint job was starting to go. The Vista Paint Store has the best quality paint and the color matching off samples can’t be beat.

Big Attic

Installed attic flooring for a portion of the large attic. This section is over one of the smaller bedrooms so it is less than 12 feet to span between supporting walls. The larger space needs 16 feet across the shortest span to place the weight on the supporting walls. As the larger space already has a bit of sag it would not be advisable to frame out a floor directly supported by the ceiling joists.

The first step was to clean up the space vacuuming out the debris and dust. Then removing the knobs tubes and any wires left from replacing the knob and tube wiring. A few connections still needed boxes and those were enclosed with non-conducting nail on boxes (although I wonder why the only cover available for the single gang is made of metal).

R-13 insulation was rolled out in the space to be floored. As usual I over estimated and insulated two bedrooms in one go. This will pay off later when the rest of the attic is insulated for winter.

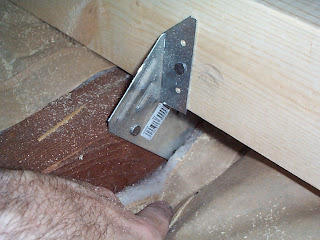
The framing for the floor was done in 1x3s laid crosswise to the ceiling joists and held in place with hurricane brackets. This time the braces were U shaped with a flange for use on the lower rafter near the eaves. These worked much better than the ones used in the lower attic (a sort of ¼ twist of flat steel.)

The plywood sheeting was the same 7/16 OSB panels but were sawed length wise into 24x48s to get them up the stairs and up through the access panel. Placing them crosswise to the top layer of framing made a much stronger and less springy floor than in the lower attic. Again, the sheets were placed shiny side up to make a smoother floor although the makings had to be sanded off since the ink rubs off and will not wash out of cloths.

Near the access panel, the framing stops make a small step. The electrical outlets for the attic placed near the access panel for practical reasons.

The leak from the upstairs toilet needs to be repaired, as the ceiling and wall are a bit soggy. The home warrantee people will repair the plumbing but will not put back any of the plaster work (huh?)

Peeled a large paint chip from where the hole will be to get the paint match. Then removed soggy plaster and cut the metal mesh base with wire cutters until there was a hole large enough to slip the digital camera in. A few pictures in each direction told if the leak was local or running down something (local) and whether there were wires and pipes to watch out for.

Once the whole is open you can see the leak is coming from ABS new work pipe connecting to ABS new work pipe. The joint between the new work and the old cast iron pipe is fine. A bucket goes under the leak until the plumber can get to it. I also draw a diagram of the whole situation to make sure they don’t start working on an assumption.

The plumbers appreciate the diagram as it save a bit time understanding the fix, especially since I am not home to point at things. They seal it up good and then it has to be sprayed with bleach to kill the bacteria and then sit open for a few weeks to dry thoroughly. This is NOT a job for a hair dryer.

Used metal mesh material to patch the hole and shape the curve just like the work that was removed. Then Fix All for the base build and patching plaster for the build up. Don’t go crazy with the Fix All since it hardens like a rock and you don’t want to sand it down. Better to build on top with the patching plaster. A large metal trowel was used to shape the curve.

A final skim of spackle and then primer. Painting to match was a matter of getting enough coats on to ensure even color and then lots of feathering around the edges. Vista Paint is so good at the match you can’t tell where the edge is even looking hard in good light!

Attic Floor

Got the materials together to put a floor in the attic over the kitchen and maids room. This is the “Cubby Attic” and is about a 12 by 19 foot space. A stud running down the center combined with the can lights from the kitchen sticking up helped us decide on raising the floor on 2x4s set on 24 crosswise from the ceiling joists that were set on 16 inches.

The flooring was to be 7/16 OSB board to save money and weight. The 4x8 sheets were sawn lengthwise to make narrow strips that would fit in through the access panel. These panels were only supported by the edges so the centers were a little springy but adequate for a space where you can’t really stand up. The ends needed 1x4 strips to tie the sheets together as the ends did not have enough support.

The 2x4 studs were kiln dried to decrease weight and were held in place with a few “strong tie” nail ons. two or three per stud is adequate with 4 for really boss work.

Of course encapsulated fiberglass insulation was laid down before the carpentry. The whole space was done 8 feet at a time and one sheet was cut into quarters to provide panels for sitting on while working.

The tricky parts going around the pipes were cut in the attic with a jigsaw. The OSB cuts like butter but getting a self-tapping carpentry screw through it is sometimes hard. I will have to experiment with regular pointy bugle head screws.

Four gang outlets were added to each end of the attic and a two gang in the ceiling wired to a witch near the door to feed lights.

Heating floor vents were added to the floor where the kitchen can lights were to vent the heat off the lights as well as flashing added around the fixtures to protect the insulation. The finishing touch was to hack saw off the larger nails sticking through the roof; a few were really scary.

The raw OSB looks really great but the labels printed on the face rubs off so a bit of sanding would be needed or something to seal the ink in. In this case there will be carpet over.

Fixing the Footwork

Cut lath for the repair of the closet where my foot went through the cieling on the table saw. A 2x4 cut on the narrow side makes 1 ¾ inch strips that are perfect laths. Use an old lath to set the thickness and leave the pieces rough to allow the plaster to adhere. After mounting the lath to the stud spray or sponge it down with water so the wood does not suck all the moisture out of the plaster. Dowman’s Fixall is pretty tolerant and I found making it a little thicker made it stickier but you had to work fast and mix a lot of small batches.

Networking

Worked on completing the phone and network feeds to the attic space. Ran a new line from the basement head end to the maid’s room to place the DSL filter at the tie in location created in the basement. Used a piece of plywood mounted over the hot water heater with a punch down panel to manage all the lines in one place just like the phone company does. Be sure to get the wires pushed down hard on the punch down panel or the jackets may not get pierced.

Ran the lines out the basement window following the heater vent to the eaves and into the lower roof portion over the kitchen. From there running up to the second floor attic is simple. Routed all three lines to one location in the attic and soldered the ends together as I did not have a second punch down panel. It is quicker anyway as there will not be changes at that location.

The network lines were similar except they cannot be joined without a hub. Without the network tool I had to take a short patch cable, cut it half and then solder it to the bare wire to attach to the hub.

While getting the work light across the attic, I got snarled in the extension cord and put my foot through the lath in the closet.

Two showers were run in the evening and then one more immediately after. The hot water heater worked like a charm. Watched “The Money Pit” after.

More Furniture

Picked up 9 by 12 area rug and spent the rest of the day at IKEA. Lost a good tape measure there but the soft serve was great. Some of the Effective line was brought home and assembled in the evening.

First Night In

October 31, 2002


The evening is Halloween and with the flood of trick-or-treaters we find the radio controlled doorbell is coded the same as the neighbor’s. Changing the tiny DIP switch on the transmitters and receiver keeps it from ringing off the one next door but it still “sounds” terrible.

Moving Day

Picked up the 18 foot truck in the morning and emptied the storage unit. Then moved furniture and big loads to the new house. Good thing the patio is paved so we could stage there. Of course there had to be rain a few days later and even with tarping there was some loss.

The White Album

Prepped, primed and painted two rooms making them white. Formerly pink and blue, we still refer to the rooms as the pink room and the blue room.

It's all about the prep! (and enough primer to hide the color).

Will the wire never end?

Completed electrical. Corrected disconnected light and light bypassing switch. Ran the ground wire from the attic spaces. It not possible to follow the drain vent from the attic to the basement, the gaps around the pipe were filled in. Instead the ground wire went out through the hole where the pole passed through the roofline to the electrical panel. The wire followed the pipe on the exterior and attached the ground stake at the box. Also finished the wiring over the kitchen.

Gas & Wire

Added a gas line to the stove where it was disconnected when installing the water heater. The flexi-hose was run down the wall into the basement where the shut off valve was placed.

Replaced all the major of knob and tube wiring runs in the main attic space with romex wiring. Major junctions were placed in boxes and runs were made using the old tubes to make it easier to add flooring later.

More Holes

Finished cutting holes for the outlets upstairs. The best method was to mask off the area completely and then put masking tape over the edges of the hole. This keeps the plaster from shedding while dragging the lines up the wall and when putting the box in the hole. Finished running all the verticals.

Holes - Argh

Cut holes in attic for the verticals. Mistook a lapboard for the ceiling for a header and shot a one inch hole through the ceiling and crown molding!

This will have to be patched, sanded and painted. Fortunately it was not dental molding!

Seriously Pulling Wire

Obtained a ¾” installer bit in the morning. This will make a slightly bigger hole for getting the romex through as well as all the AV/Network lines. The New bit cuts fast but the point gets broken off on the third hole. This makes it impossible to gat a purchase on the cross bars as they are at a 45 degree angle. Since the bit fits inside a ¾” piece of conduit I will need to get a new bit and use the conduit as a guide. Regardless I was able to get two lines of 12 gauge up the walls and three lines of Phone/Cable/Network up one more hole. The communications wires were pulled sequentially by taping each line to the next about three feet apart.

Pulling Wire

Drilled the header at the top of the wall and the cross bar between the studs with a 4 foot installers drill bit. A bit of trouble pulling the wire as the hole is a bit small. When drilling the header an auger bit in a heavy drill works best. The installers bit tends to go to the corner if the cross bar is at a 45 degree angle, this will reduce the effective diameter and make it harder to get the cable through. Also any loose materiel in the wall may plug the hole.

Cutting Outlet Holes

Continued work on the outlets; cutting the holes. A diamond wheel on a Makita cuts the plaster very cleanly; pull out the plaster bits with a chisel. An 18-tooth hack saw blade on a jigsaw cuts the lath. If the lath pulls away from the plaster, a screwdriver can lever the piece outwards to steady it. Cut the lath only part way through on one side until the other end is cut.

Laundry Day

Washing machine and dryer delivered. The washer slid off the dolly making a small scratch on the front side. Sears offers a discount which turns out to be a coupon towards other merchandise. After some haggling the discount will be sent in a check.

The gas line was run three feet from the T in the basement and up through the floor. Again measurements are critical to get the line up through the floor with the close space. It turns out the linoleum had tile under and a nail set was needed to break through the tile before the drill bit could do it’s work.

Tank Out, Tankless In

Installed new tankless hot water heater with the help of Mark Greenwald. First we shut off the water and gas and then used a Sawsall with a hacksaw blade to cut the water and gas lines. A trashed hose from the yard was cut down to get the drain tap into the pickle barrel for draining the tank. After a few loads a short bucket was used to get lower than the top of the pickle barrel. Eventually even this slows down, blowing into the inlet pipe at the top gets the water out quicker.

The Aquastar 240 needs to be mounted to the wall. Concrete anchors were set into predrilled holes with epoxy pushed into the holes. These anchors hold the 2x4s to mount the unit to. The gas line cannot use flexi-hose, as the gas rate is too high. The lines had to be planned very carefully as adding elbows to make the match up will reduce the velocity of the gas as well.

When attaching the copper lines, be careful not to transmit too much heat into the unit while making the solder connections.

Once the unit is hooked up and the water and gas lines turned on, bleed the air from the line by backing off a connection near the unit or backing out a plug. At ½ PSI this is easy to do. The Aquastar will need about 2 amps of 110-volt power and will not turn on until the hot water lines flow.

Venting must be run separately from other units like furnaces and stoves. Single wall venting is fine and the unit comes with very good installation instructions including a video.

More Power

Work started on the electrical outlet additions. The “old work” boxes have templates but after measuring the location of a few, a template cut from a pizza box lid will ensure they are all the same height from the floor and speed things along. The wiring for the downstairs will be simple, as a hole drilled through the joist to the crawl space will work just fine.

More Funky Floor

One additional spot on the floors was reinforced, a split board with one part having a gap to the supporting beam. The side with the gap felt supported, while the part that was snug with the supporting beam had a small gap just under the hard wood making it feel spongy and unsupported near a door saddle. It will have to be filled in from the topside, epoxy perhaps?

Lawn Care


Purchased lawn mower and mowed lawn.

Tankless Water Heater

The decision was made to increase the capacity of the hot water heater. 50 gallons came up short in another house of about the same size. We decided to install the Aquastar 240FX tankless hot water heater. The energy savings and no recovery time made it very attractive. The unit came with a descent set of instructions and a video that described the unit and its installation in great detail. Proper venting seemed to be stressed the most. All the literature says the wall mount brackets are an optional addition but there were inside the box, the ones I bought separately will have to be returned.

Refinishing Floors


Floor refinishing contractor started sanding the floors. He was able to rough sand the entire downstairs in one day. I arrived on the scene about 1:30 in the afternoon with Meg and discussed floor finishes with him. The natural finish of golden oak is very orange and it actually looks better with the brown tinge of dirt on them. We decided to have a stain added to make it darker and browner. This of course added almost $1000 to the final price. A third coat of polyurethane was added as well.

The floors are a bit wavy through out the house but generally level, no tilts. This is from a combination of settling of the piers and uneven sanding from the previous finisher. A few places have had replaced wood as well. One area was of particular concern and inspection of the underside showed both the main joist and the cross joist had been cut to allow new venting to go up an interior wall. The joists had additional supports added but the work left the floor a bit more uneven than usual. Additionally, there was a spot near the doorframe from the living room to the dining room where the floorboards felt spongy. It turns out some spots, all no larger than 4 inches had no sub floor support.

Small pieces of plywood and in some cases, scrap from the previous work was used to fill out the gaps in the sub floor. It was like doing a jig saw puzzle, only the pieces would be above you so eye protection and a dust mask are essential. Squares of plywood were screwed into existing sub floor to hold the whole works together. Shim stock was essential as well to make the tightest possible fit, either to compensate for varying widths of stock or to shim the sub floor to the new joist work.

Lessons learned while working under the house were, get a kit of stuff in a box and drag it in there with you, getting in and out is harder than just staying there. Also keep a chunk of 4x4 handy to prop your head up like a pillow. Also measure all the stock used, every beam and joist, the old houses used whole inches and the repair work used modern milled stock – ouch.

After the floor guys knocked off for the day, I removed polyurethane from the edge of the fireplace hearth. The previous job had rolled the polyurethane on and overlapped onto the stonework. Paint and epoxy remover brushed on and then brushed off a few moments later with a wire brush worked like a charm. The stone is not a porous as brick. Use disposable everything for this job, as the remover is very strong.